Vous allez mettre en pratique les éléments de cette leçon dans les exercices suivants :
Objectif :
Créez le modèle « A Contact » pour obtenir le résultat suivant :
Réalisation :
Sur la connexion « Alizes », faites un clic droit puis « Nouveau >> Nouveau modèle ». Nommez votre modèle « A Contact ».
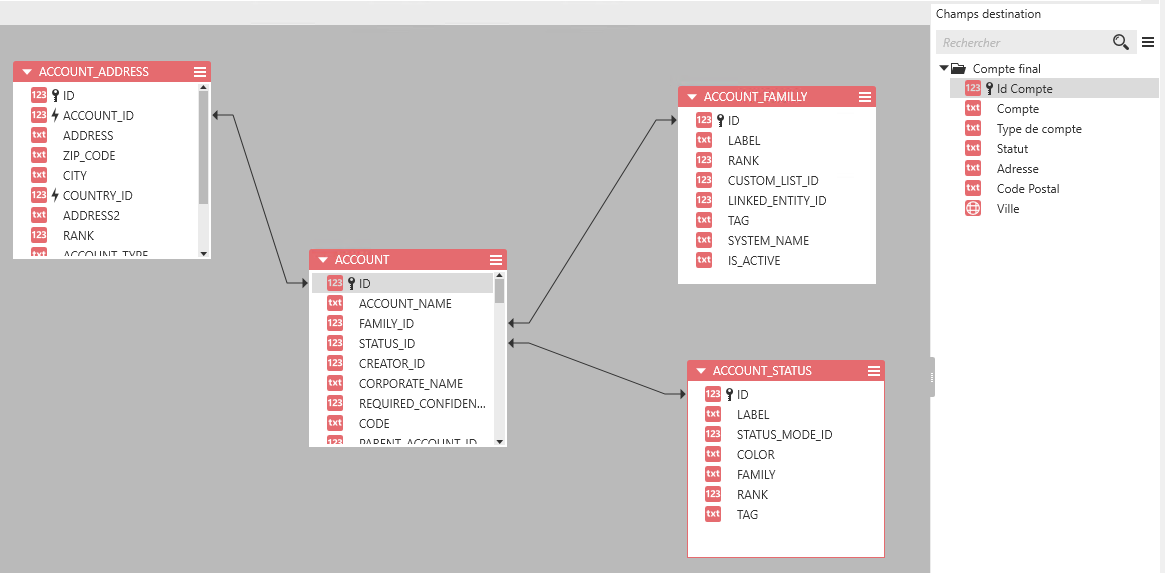
Dans l’espace « Mapping » cliquez sur « Tables de la connexion ». Dans la fenêtre qui s’ouvre, sélectionnez les tables « USERS », « USER_POSITION », « USER_SERVICE », « USER_STATUS » et « GENDER ».
Faites les jointures entre les tables de la manière suivante :
USERS.STATUS_ID = USER_STATUS.ID
USERS.SERVICE_ID = USER_SERVICE.ID
USERS.POSITION_ID = USER_POSITION.ID
USERS.GENDER_ID = GENDER.ID
Dans les champs destination, créez le dossier « Contact ».
Ajoutez les champs destination en les faisant glisser sur le dossier « Contact » puis renommez-les de la manière suivante :
« USERS.ID »
, renommé en
« # Id Contact »
« USERS.ACCOUNT_ID »
, renommé en
« # Id Compte »
« GENDER.LABEL »
, renommé en
« Civilité Contact »
« USERS.LAST_NAME »
, renommé en
« Nom Contact »
« USERS.FIRST_NAME »
, renommé en
« Prénom Contact »
USERS.EMAIL_ADDRESS
, renommé en
« Mail Contact »
USERS.BIRTHDAY
, renommé en
« Anniversaire Contact »
USER_STATUS.LABEL
, renommé en
« Statut Contact »
USER_SERVICE.LABEL
, renommé en
« Service Contact »
USER_POSITION.LABEL
, renommé en
« Fonction Contact »
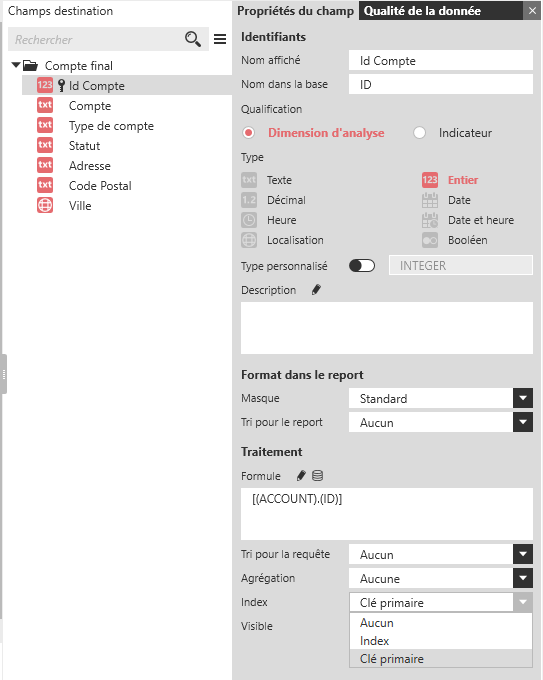
Déclarez le champ « # Id Contact » en « Clé primaire » et le champ « # Id Compte » en « Index ».